Content
- How I came to write this blog ?
- Prerequisites
- Setting up openfaas with Kubernetes.
- Openfaas vs Openwhisk
- Kubernetes architecture(K8s).
- Openfaas architecture.
- Kubectl
- Kubeadm
- Kops
- K3s.
Again, How ?
I am avid reader and appreciator of hackernews that somehow (even on dinners) it comes in my conversations, I become extremely enthusiastic about it and within few minutes I will get the android app installed. So while I was reading I read this article, I also read the reddit discussion on this. So this blog gave me the required push to don the hat to write this blog. I have meaning to write this blog for some time.
Prerequisites
I assume that you have linux and docker installed. My linux version is 5.0.0-29-generic, docker version is 19.03.2.
Kubernetes.
There are multiple ways getting started to kubernetes. Minikube is the more popular choice. But I took the road less travelled. Not just because of robert frost, but also due to docker being installed. So I used the project kubernetes in docker(kind). Kind of love to keep my system minimalistic and neat.
Getting started with kind and openfaas
I will explain in later part of blog what different things I am going to get you installed. Download the binary
curl -Lo ./kind https://github.com/kubernetes-sigs/kind/releases/download/v0.5.1/kind-$(uname)-amd64
chmod +x ./kind
./kind create cluster --loglevel debug
Make sure that your current linux user have the right to use docker without sudo. Adding –loglevel shows you what’s happening. If everything goes fine you will get “Cluster creation complete.” To check if a cluster was created
docker container ls
You will get something like
CONTAINER ID        IMAGE                  COMMAND                  CREATED             STATUS              PORTS                                  NAMES
d11524e810a9        kindest/node:v1.15.3   "/usr/local/bin/entr…"   2 minutes ago       Up 2 minutes        45509/tcp, 127.0.0.1:45509->6443/tcp   kind-control-plane
Now moving forward, we have to install kubectl to manage the kubernetes cluster you have created.
curl -LO https://storage.googleapis.com/kubernetes-release/release/v1.16.0/bin/linux/amd64/kubectl
sudo mv kubectl /usr/local/bin/
export KUBECONFIG="$(kind get kubeconfig-path --name="kind")"
chmod +x /usr/local/bin/kubectl
kubectl config current-context
kubectl get pods --all-namespaces
Now let’s install openfaas
git clone https://github.com/openfaas/faas-netes
kubectl apply -f https://raw.githubusercontent.com/openfaas/faas-netes/master/namespaces.yml
cd faas-netes && \
kubectl apply -f ./yaml
PASSWORD=$(head -c 12 /dev/urandom | shasum| cut -d' ' -f1)
kubectl -n openfaas create secret generic basic-auth \
--from-literal=basic-auth-user=admin \
--from-literal=basic-auth-password="$PASSWORD"
kubectl get all -n openfaas
Now keep checking “kubectl get all -n openfaas” until you get status of “pod/gateway” in Running. After you get that do
nohup kubectl port-forward svc/gateway -n openfaas 31112:8080 > /dev/null 2>&1 &
Do a
echo $PASSWORD
copy it. Go to http://127.0.0.1:31112/ui/ , username is “admin” and the password is the copied one.
Now in the last step
export OPENFAAS_URL=http://127.0.0.1:31112
curl -sSL https://cli.openfaas.com | sudo sh
echo -n $PASSWORD | faas-cli login --password-stdin
faas-cli deploy -f https://raw.githubusercontent.com/openfaas/faas/master/stack.yml
Play with the ui portal. Check out their official doc
Checkout their lab on how to features available in openfaas. lab
Openfaas vs Openwhisk
What I really liked about openfaas was how they package their function. There is no need to download runtime as in Openwhisk. Even setting up openwhisk is tough. I have doubts regarding how much it is being maintained. Openfaas ran at the first instance. No debugging required.
How do Openfaas package it’s application ?
Openfaas package their application in docker. In openwhisk there is already a predefined runtime, but if you want a different runtime you can define blackbox docker-actions, otherwise you have to write a manifest. In aws serverless you have to package them as zip. In open faas you can add extra dependency in an intuitve environment friendly way. Even writing function is really easy. So you can make a build job on your devops server which pushes your created docker image to your private docker registry. Some openfaas cli commands references
Kubernetes architecture.
This part of the blog is meant as a note to self rather than a tutorial.
K8s
Ref
There are 8 feature which kubernetes promises to fulfil:-
- Replication of components
- Auto-scaling
- Load balancing
- Rolling updates
- Logging across components
- Monitoring and health checking
- Service discovery
- Authentication
Glossary
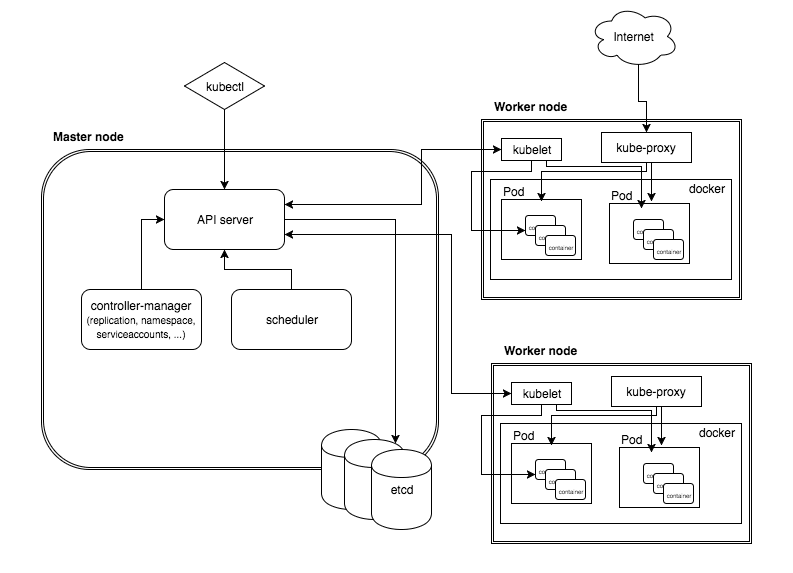
- Pod :- It is a group of container. This group of containers would share storage, Linux namespaces, cgroups, IP addresses. These are co-located, hence share resources and are always scheduled together.
- Service :- As pods have a short lifetime, there is not guarantee about the IP address they are served on. This could make the communication of microservices hard. Hence the concept of service as a proxy on top of pod. You can also configure load balancing on top of number of pods.
- Api server :- The API server is the entry points for all the REST commands used to control the cluster.
- Scheduler :- The deployment of configured pods and services onto the nodes happens thanks to the scheduler component.
- Controller manager :- A controller uses apiserver to watch the shared state of the cluster and makes corrective changes to the current state to change it to the desired one. Lots of different type of controller like Replication controller, endpoints controller, namespace controller, and serviceaccounts controller etc.
- Kubelet :- kubelet gets the configuration of a pod from the apiserver and ensures that the described containers are up and running. This is the worker service that’s responsible for communicating with the master node.
- kube-proxy :- kube-proxy acts as a network proxy and a load balancer for a service on a single worker node. It takes care of the network routing for TCP and UDP packets.
Pod lifecycle
- Pending :- The Pod has been accepted by the Kubernetes system, but one or more of the Container images has not been created.
- Running :- The Pod has been bound to a node, and all of the Containers have been created. At least one Container is still running, or is in the process of starting or restarting.
- Succeded :- All Containers in the Pod have terminated in success, and will not be restarted.
- Failed :- All Containers in the Pod have terminated, and at least one Container has terminated in failure.
- Unknown :- For some reason the state of the Pod could not be obtained, typically due to an error in communicating with the host of the Pod. Pod conditions
Kubernetes the hard way.
All credits to kelseyhightower because I am copying straightaway. Ref
Step 1
- Provision a subnet with an ip-address range large enough to assign a private IP address to each node in the Kubernetes cluster.
- Create a firewall rule that allows internal communication across all protocols
- Create a firewall rule that allows external SSH, ICMP, and HTTPS
- Allocate a static IP address that will be attached to the external load balancer fronting the Kubernetes API Servers
- Create three compute instances which will host the Kubernetes control plane(master node)
- Create three compute instances which will host the Kubernetes worker nodes. Each worker instance requires a pod subnet allocation from the Kubernetes cluster CIDR range. The pod subnet allocation will be used to configure container networking in a later exercise. The pod-cidr instance metadata will be used to expose pod subnet allocations to compute instances at runtime.
Step 2
- Provision a Certificate Authority that can be used to generate additional TLS certificates.
- Generate the admin client certificate and private key
- Create a certificate for each Kubernetes worker node that meets the Node Authorizer requirements. Generate a certificate and private key for each Kubernetes worker node. Note: Kubernetes uses a special-purpose authorization mode called Node Authorizer, that specifically authorizes API requests made by Kubelets. In order to be authorized by the Node Authorizer, Kubelets must use a credential that identifies them as being in the system:nodes group, with a username of system:node:nodeName.
- Generate the kube-controller-manager client certificate and private key.
- Generate the kube-proxy client certificate and private key.
- Generate the kube-scheduler client certificate and private key.
- Generate the Kubernetes API Server certificate and private key. Note: static IP address will be included in the list of subject alternative names for the Kubernetes API Server certificate. This will ensure the certificate can be validated by remote clients.
- Generate the service-account certificate and private key. Note: The Kubernetes Controller Manager leverages a key pair to generate and sign service account tokens.
Step 3
- Generate kubeconfig files for the controller manager, kubelet, kube-proxy, and scheduler clients and the admin user. Note : Each kubeconfig requires a Kubernetes API Server to connect to. To support high availability the IP address assigned to the external load balancer fronting the Kubernetes API Servers will be used.
- Use kubectl to generate your own kubeconfig and scp the files to their respective places.
- Create the encryption-config.yaml encryption config file and scp it to each controller instance.
Step 4
This step is called Bootstrapping the etcd Cluster. etcd is a distributed reliable key-value store which is used to store cluster state.
- Extract and install the etcd server and the etcdctl command line utility in controller servers.
- Create directory “/etc/etcd” & “/var/lib/etcd” and copy kubernetes API server certificate and key.
- The instance internal IP address will be used to serve client requests and communicate with etcd cluster peers.
- Set the etcd name to match the hostname of the current compute instance.
- Create the etcd.service systemd unit file.
- Start the etcd Server.
Step 5
All these steps will be replicated in all controller nodes.
- Download and install kube-apiserver, kube-controller-manager, kube-scheduler and kubectl.
- Create /var/lib/kubernetes.
- Move kubernetes api server and service account certificate and key to /var/lib/kubernetes.
- Move the kube-controller-manager kubeconfig to /var/lib/kubernetes.
- Create the kube-controller-manager.service systemd unit file.
- Move the kube-scheduler kubeconfig /var/lib/kubernetes.
- Create the kube-scheduler.yaml configuration file.
- Create the kube-scheduler.service systemd unit file.
- Start the Controller Services.
- Enable http health check. It’s on 127.0.0.1:6443/healthz .Ref
- kubectl get componentstatuses –kubeconfig admin.kubeconfig
Step 6
In this section you will configure RBAC permissions to allow the Kubernetes API Server to access the Kubelet API on each worker node. Access to the Kubelet API is required for retrieving metrics, logs, and executing commands in pods.
- Create the system:kube-apiserver-to-kubelet ClusterRole with permissions to access the Kubelet API and perform most common tasks associated with managing pods. You will use kubectl from any one controller server to execute this command.
- Bind the system:kube-apiserver-to-kubelet ClusterRole to the kubernetes user
- Provision an external load balancer to front the Kubernetes API Servers.
Step 7
In this step we will bootstrap the Kubernetes worker nodes. Run these command on each worker node.
- Install socat, conntrack and ipset. Disable swap.
- Download and install worker binaries.
wget -q --show-progress --https-only --timestamping \ https://github.com/kubernetes-sigs/cri-tools/releases/download/v1.15.0/crictl-v1.15.0-linux-amd64.tar.gz \ https://github.com/opencontainers/runc/releases/download/v1.0.0-rc8/runc.amd64 \ https://github.com/containernetworking/plugins/releases/download/v0.8.2/cni-plugins-linux-amd64-v0.8.2.tgz \ https://github.com/containerd/containerd/releases/download/v1.2.9/containerd-1.2.9.linux-amd64.tar.gz \ https://storage.googleapis.com/kubernetes-release/release/v1.15.3/bin/linux/amd64/kubectl \ https://storage.googleapis.com/kubernetes-release/release/v1.15.3/bin/linux/amd64/kube-proxy \ https://storage.googleapis.com/kubernetes-release/release/v1.15.3/bin/linux/amd64/kubelet - create directories.
sudo mkdir -p \ /etc/cni/net.d \ /opt/cni/bin \ /var/lib/kubelet \ /var/lib/kube-proxy \ /var/lib/kubernetes \ /var/run/kubernetes - Install the worker binaries:
{ mkdir containerd tar -xvf crictl-v1.15.0-linux-amd64.tar.gz tar -xvf containerd-1.2.9.linux-amd64.tar.gz -C containerd sudo tar -xvf cni-plugins-linux-amd64-v0.8.2.tgz -C /opt/cni/bin/ sudo mv runc.amd64 runc chmod +x crictl kubectl kube-proxy kubelet runc sudo mv crictl kubectl kube-proxy kubelet runc /usr/local/bin/ sudo mv containerd/bin/* /bin/ } - Configure CNI Networking. Create the bridge network configuration file /etc/cni/net.d/10-bridge.conf.Note: CNI (Container Network Interface), a Cloud Native Computing Foundation project, consists of a specification and libraries for writing plugins to configure network interfaces in Linux containers, along with a number of supported plugins. CNI concerns itself only with network connectivity of containers and removing allocated resources when the container is deleted. Because of this focus, CNI has a wide range of support and the specification is simple to implement.
- Create the loopback network configuration file in /etc/cni/net.d/99-loopback.conf.Note:The loopback interface is a virtual interface. The only purpose of the loopback interface is to return the packets sent to it, i.e. whatever you send to it is received on the interface
- Create the containerd configuration file in /etc/containerd/. Create the containerd.service systemd unit file.
- Configure the kubelet by copying hostname keypair and hostname kubeconfig to /var/lib/kubelet/kubeconfig. Move ca.pem to /var/lib/kubernetes.
- Create the kubelet-config.yaml configuration file. Create the kubelet.service systemd unit file.
- Create the kube-proxy-config.yaml configuration file. Create the kube-proxy.service systemd unit file.
- Start worker services.
{ sudo systemctl daemon-reload sudo systemctl enable containerd kubelet kube-proxy sudo systemctl start containerd kubelet kube-proxy } - Generate a kubeconfig file for the kubectl command line utility based on the admin key pair.
Step 8
Pods scheduled to a node receive an IP address from the node’s Pod CIDR range. At this point pods can not communicate with other pods running on different nodes due to missing network routes.
- Create network routes for each worker instance.
- Deploy the coredns cluster add-on.
- Create a busybox deployment.
- Do a smoke test and then clean all instances you have created.
Openfaas.
Workflow
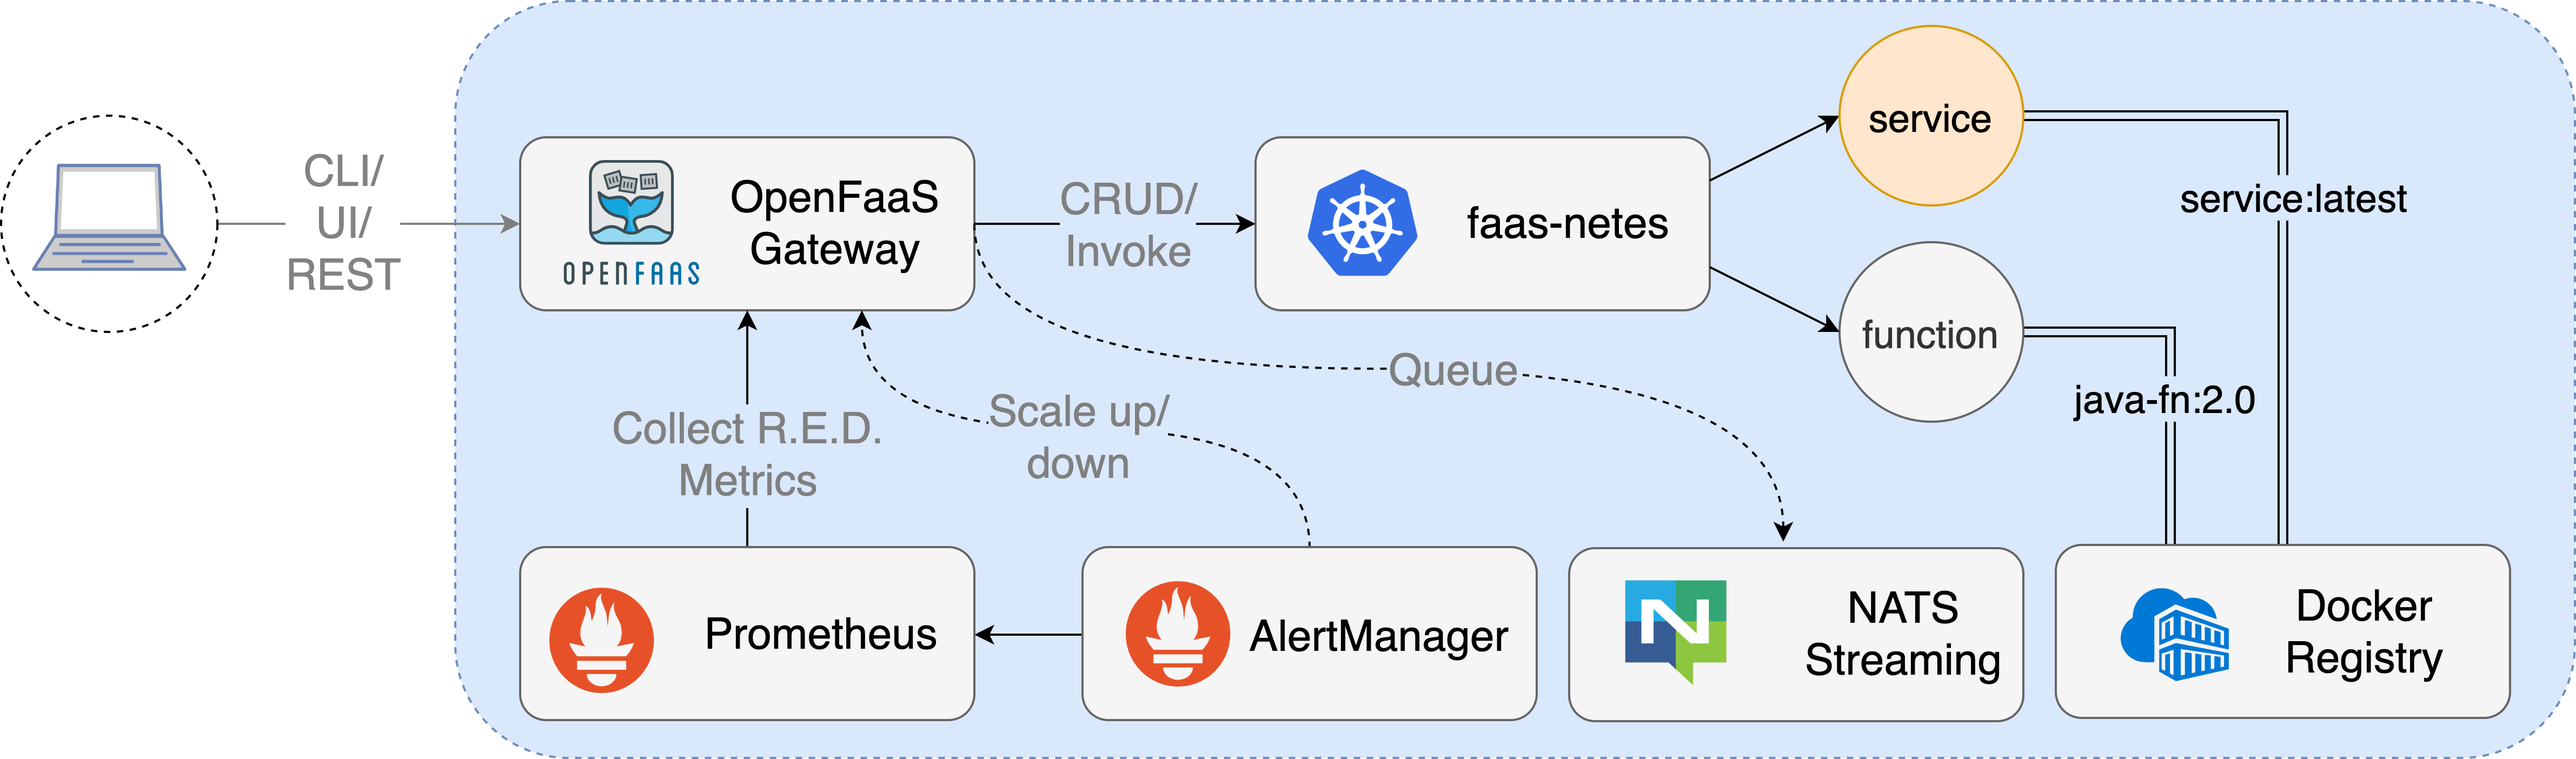
Api Gateway
 When deployed each function creates 1 to many Pods/containers depending on the minimum and maximum scaling parameters requested by the user.
Watchdog.
- The OpenFaaS watchdog is responsible for starting and monitoring functions in OpenFaaS. Any binary can become a function through the use of watchdog.
- The watchdog becomes an “init process” with an embedded HTTP server written in Golang, it can support concurrent requests, timeouts and healthchecks.
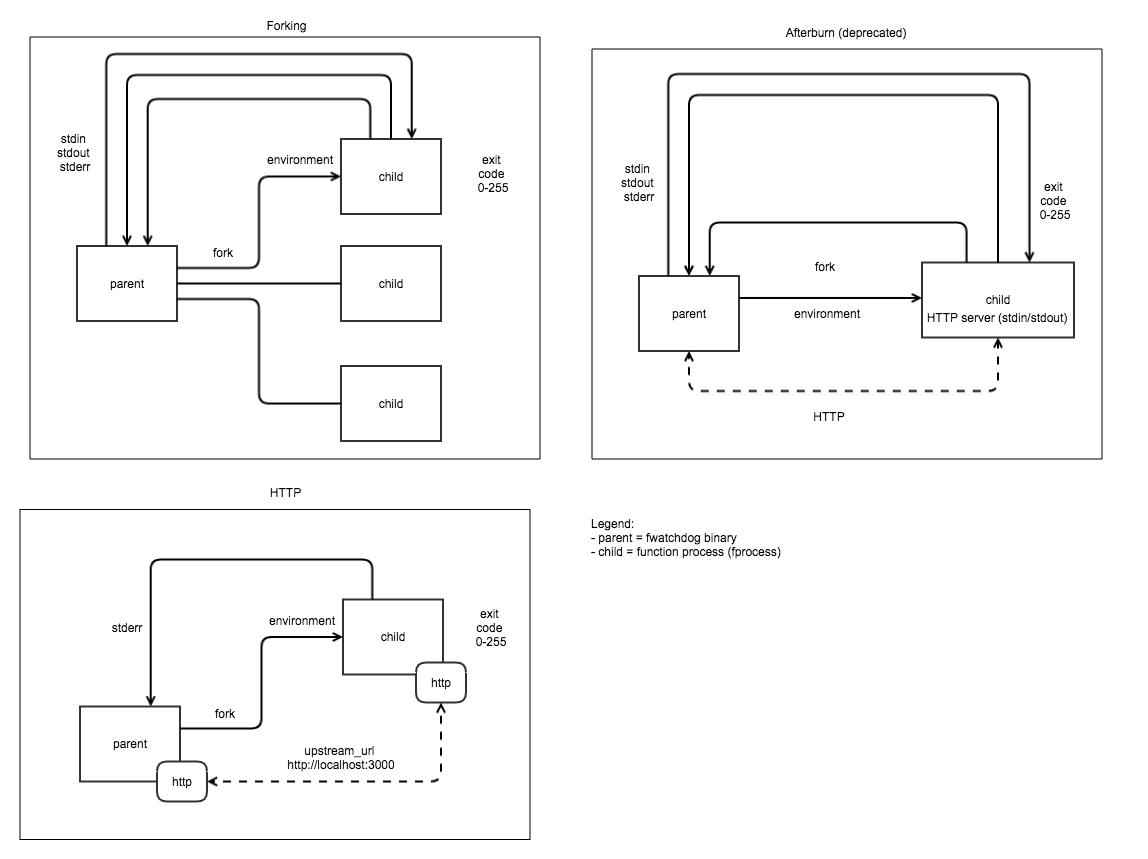
- Above architecture is for of-watchdog(old version is called classic watchdog).
- There are 5 different mode of-watchdog, “http” in which a process is forked when the watchdog starts, we then forward any request incoming to the watchdog to a HTTP port within the container, “serializing” forks one process per request. Multi-threaded. Ideal for retro-fitting a CGI application handler reads entire request into memory from the HTTP request, “streaming” Forks a process per request and can deal with a request body larger than memory capacity - i.e. 512mb VM can process multiple GB of video, “static” This mode starts an HTTP file server for serving static content found at the directory specified by static_path.
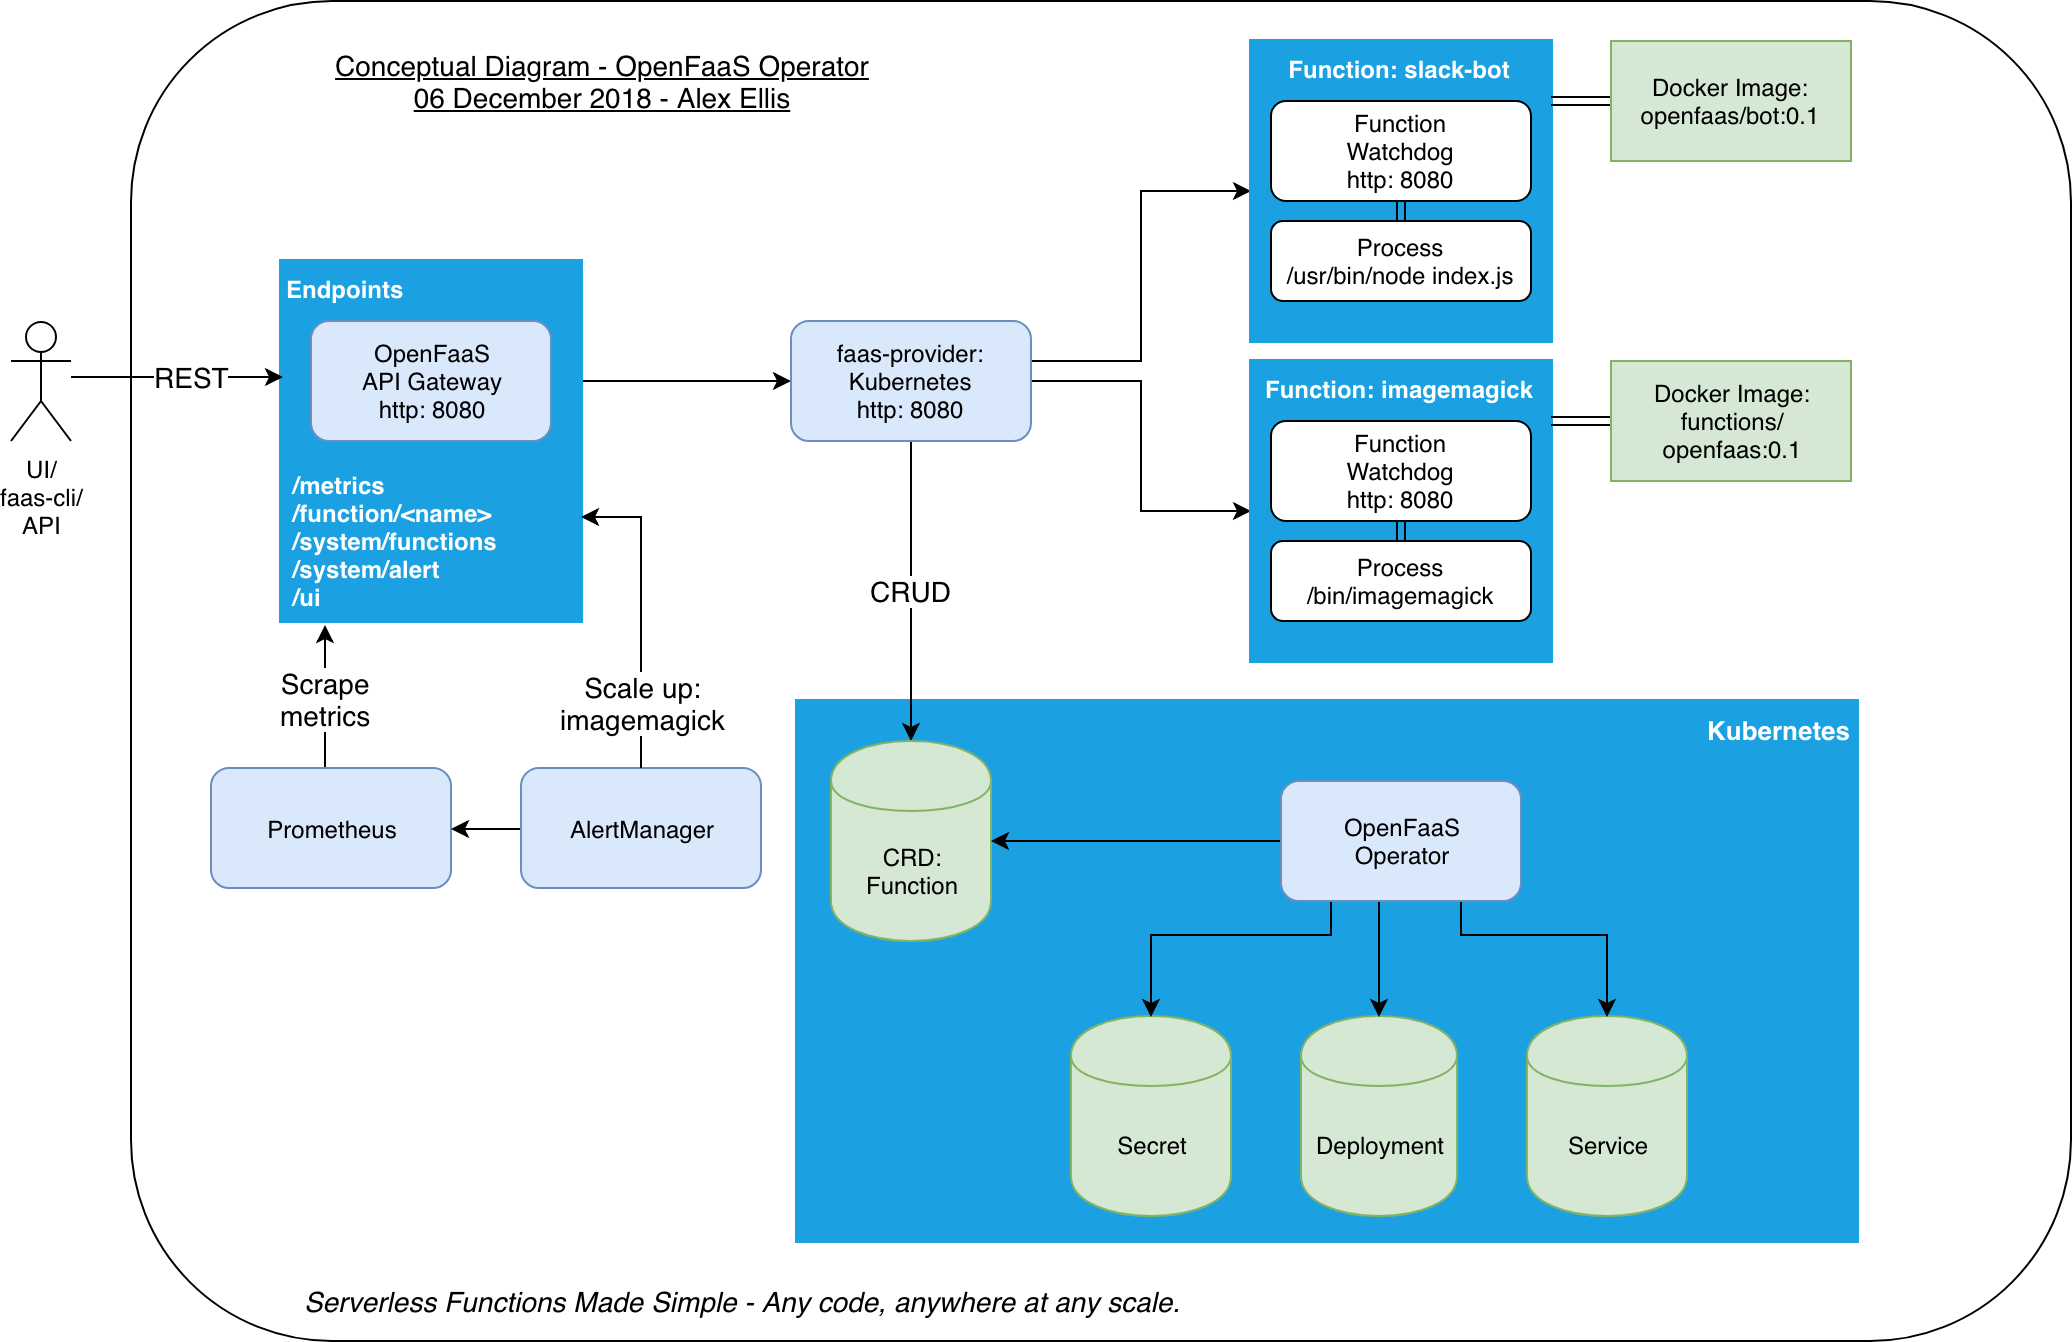
Autoscaling
The API Gateway handles AlertManager alerts through its /system/alert route.The minimum (initial) and maximum replica count can be set at deployment time by adding a label to the function.
Kubectl
Kubectl is a command line interface for running commands against Kubernetes clusters. kubectl looks for a file named config in the $HOME/.kube directory. You can specify other kubeconfig files by setting the KUBECONFIG environment variable or by setting the –kubeconfig flag. All those commands of creation on kubeconfig, getting custer health, and everything needed to manage a kubernetes cluster can be done using kubectl. Kubectl-CheatSheet
Kubeadm
Kubeadm is a tool built to provide kubeadm init and kubeadm join as best-practice “fast paths” for creating Kubernetes clusters. kubeadm performs the actions necessary to get a minimum viable cluster up and running. By design, it cares only about bootstrapping, not about provisioning machines. Checkout kubeadm commands here.
Kops
kops helps you create, destroy, upgrade and maintain production-grade, highly available, Kubernetes clusters from the command line. AWS (Amazon Web Services) is currently officially supported, with GCE and OpenStack in beta support, and VMware vSphere in alpha, and other platforms planned. HOw is it different from kubeadm is kubeadm doesn’t allocate or deallocate resource.
k3s
It is a lightweight version of kubernetes. It is a fully compliant Kubernetes distribution. A binary of less than 40 MB. Only 512 MB of RAM required to run. Reference to build your own cluster. Ref